Quickly convert, edit, cut videos, audios, DVDs to other formats and devices with lossless quality.
Easily recover lost or deleted data or remove locked screens from iPhone, iPad and iPod touch.
How Does VSDC Cut Video | Quick Guide
Get link
Facebook
X
Pinterest
Email
Other Apps
VSDC Free Video Editor, a non-linear editing application, is able to process high-resolution footage including VR 360-degree, 3D and 4K UHD videos. With this all-powerful tool, you will be able to apply motion tracking, post-production effects, live color correction, etc. record voice, capture video, and more. Video editing can be exciting. You can split and cut scenes into shorter parts to compose a more dynamic story for any other purpose. In this tutorial, we'll take you through the steps on how to make VSDC cut video. Additionally, we'll humbly recommend another video cutter that is simpler yet very capable to both beginners and professionals.
Method 1. Trim Video in VSDC Free Video Editor
Method 2. Split Video in VSDC Free Video Editor Alternative
Method 1. Easy Steps to Cut Video in VSDC Free Video Editor
As a totally open-source, VSDC Free Video Editor can be a comprehensive program for users. Now, let's see how to cut video with VSDC.
Note: The operating interface of VSDC Free Video Editor is not straightforward enough, which will overwhelm new starters. If you set about previewing the designated video file, it will start an independent video player to do that work for you.
Step 1 Launch VSDC Free Video Editor and import video file
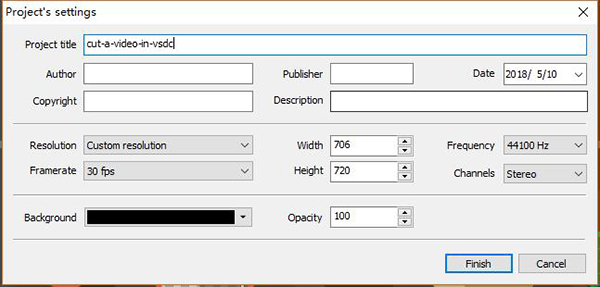
Double click the icon on your desktop screen to open VSDC Free Video Editor. Hit "Import Content" so that you can search for a definite video file from your computer's local folder. When determining the video, the "Project's settings" will be shown at once which empowers you to customize some parameters at your own will.
Step 2 Decide cutting area to remove
The chosen video file will be presented in the central position. You have the right to preview it firstly. Then move the playhead and handles to make sure which part you don't need. When getting ready, utilize the "Cut out fragment" button on the top Tools menu of the "Editor" tab.
Likewise, you can right-click the video clip to bring up the "Cutting and splitting" option in the object menu or simply press it on the right part "Properties window".
Step 3 Edit video and save it on your PC
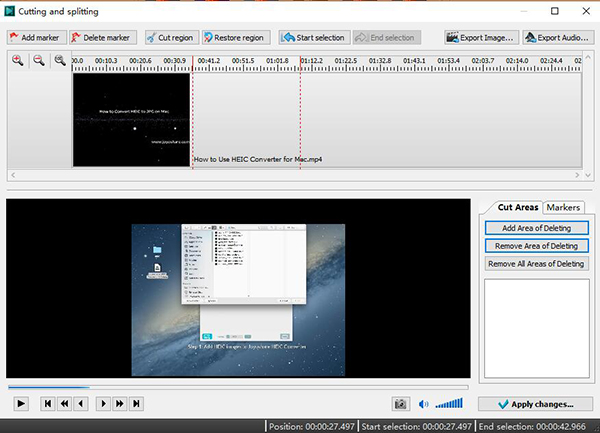
Afterward, there will be a pop-up window that facilitates you to edit your video file in VSDC Free Video Editor. To get rid of the unwanted portion from a required video, you can mark a region and click the "Cut region" icon, which will be deleted right away and added to the "Cut Area" window. Hence, if you need, you can also restore it at a later time by hitting the "Remove Area of Deleting" button.
Then it's your time to export your edited video. You can directly save it on your PC in a distinct format. Moreover, it's as well available to output to DVD, transfer to iPhone/iPad or generate to the web.
Method 2. Complete Guide to Cut Video in Joyoshare Media Cutter
Providing more thoughtful designs than VSDC Free Video Editor, Joyoshare Media Cutter is regarded as one of the most dedicated video cutters. It is sufficient enough to fit specific requirements from different users, which makes it a top priority for novices particularly.
Without re-encoding process, Joyoshare Video Cutter can assist you to strip useless parts at 60X faster speed. Aside from high-quality output, this straightforward tool can even support exporting destination files to abundant formats along with popular devices, such as MP4, M4V, MKV, AVI, DV, DivX, SWF, HD MOV, TS, M4A, AAC, M4R, MP3, AU, AIFF, or smart TV, Xbox 360, PSP, BlackBerry Bold, iPad, iPhone, Android, etc. Most of all, you are entitled to stylize your own videos by re-setting the relevant parameters, like codec, sample rate, quality, resolution, bit rate, etc.
Surely, Joyoshare Video Cutter can as well be applied to merge video clips into a seamless one, act as a ringtone maker, rip audio from video only, eliminate noise from recording and shrink video to a manageable size and so on.
Key Features of Joyoshare Media Cutter
Cut any video file without damaging the quality
With innovative acceleration process to work fast
Join different video cuts together in the finest way
Be compatible well with multiple formats and devices
Permit you to make customized videos as you want
Step 1Get Joyoshare Media Cutter run to add video file
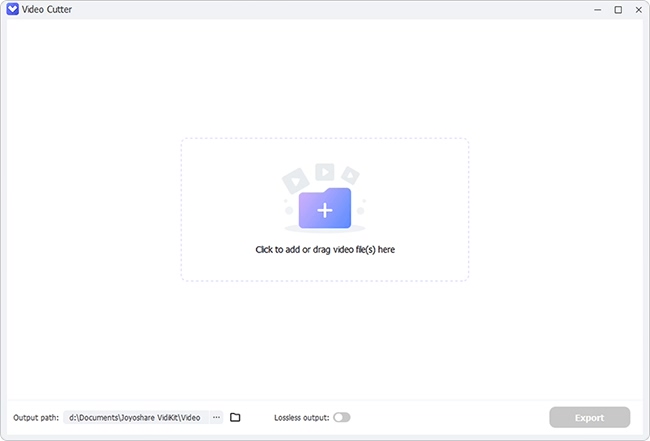
Since you have equipped your computer with Joyoshare Video Cutter already, you can go straight to run it and import a selected video file. Specify a video and directly drag it to the main cutting interface. Or you can simply click the "Open" button so that you can browse your local folder to get one video added.
Step 2Remove needless sections and keep desired portions
As long as the video is loaded completely in the main interface, Joyoshare Media Cutter will play it for you automatically. Combining the progress bar with the played video frame, you can figure out which part to be cut explicitly. More both handles for beginning and endpoints to isolate required parts. Alternatively, you can enter precise start time as well as end time to set up the temporal intervals.
To join all video cuts that you want together, just go to press the "+" icon to produce more than one new segment and meanwhile tick the "Merge Segments" option.
Step 3Opt for cutting mode for the required video
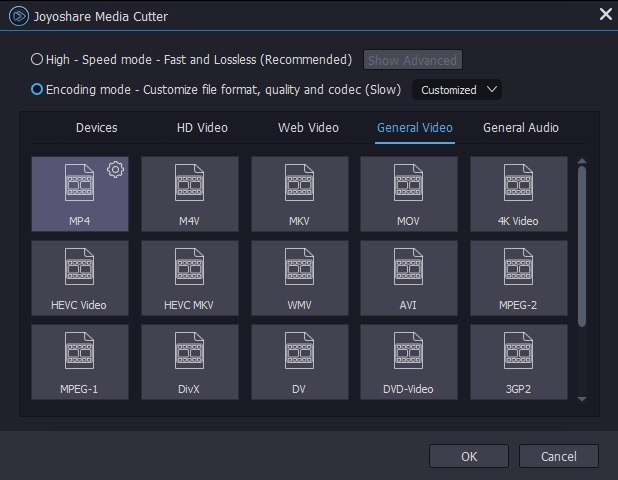
Hit the "Format" panel and you will be led to choose one cutting mode for your video file. "High-Speed" mode can be used to fulfill a lossless task in a fast way while the "Encoding" mode gives you chance to make customized videos. Having selected the destination format, you can press the gear icon on its top right corner. As per your requirements, you can change resolution, codec, bit rate, sample rate and channel and more parameters freely.
Step 4Begin to cut video with Joyoshare Media Cutter
Without any further operations, you are supposed to click the "Start" button to let Joyoshare Media Cutter show its powerful capability. Working at up to 60X faster speed makes cutting process easier than expected. Certainly, you are allowed to see the finished video in your destination folder.
For more information, you could visit the source page:
Grand Theft Auto V, also GTA V, is an action-adventure game played from either a first-person perspective or a third-person perspective. In the world navigated on foot or by vehicle, players will be able to control the three lead protagonists and switch among them both during and outside missions involving shooting and driving. So if you would like to learn how to record GTA V so that you can save your greatest gaming moments and share them with other players worldwide, you can refer to this article, which is going to teach you how to make it in two fast and easy ways. Part 1. Default Way to Record GTA V Gameplay Part 2. Unlimited Way to Record GTA V Gameplay Part 1. How to Record Grand Theft Auto with a Built-in Recorder To meet users' needs, Rockstar adds a recording feature to the GTA V named Rockstar Editor. It can let you record, edit and share the video. It has special camera modes, depth of field, filters, and audio customizations. However, it only can be used when you e...
Windows Media Video, also known as WMV, developed by Microsoft as part of the Windows Media Framework, is a series of video codec along with their responding video coding formats. A WMV cutter is an application that is able to cut, trim and split large WMV video files in no time flat. Since WMV format is commonly used, it's necessary to learn how to cut WMV without sparing too much effort. Here Joyoshare VidiKit and Aconvert are highly recommended. Read on to find out what makes them unique as a WMV trimmer and how to use them to cut WMV files online and offline easily and quickly. Part 1. How to Cut WMV Videos - Lossless Video Cutter Part 2. Tips to Trim WMV Videos - Online Video Cutter Part 1. Cut WMV Files with No Quality Loss - Joyoshare VidiKit Among all desktop WMV video cutting tools on the internet, Joyoshare VidiKit could be the best and easiest one to help you cut WMV files without re-encoding at a lightning fast speed.It allows you to split WMV into small pieces, ...
Microsoft Teams is the hub for team collaboration that integrates everything required by a team like team chat, conversation, calling, team meeting, video conferencing. Usually, after a meeting in Microsoft Teams, people might want to review the meeting video. For this, you need to record a video for the online meeting. How to record Microsoft Teams meeting easily? The following lists 2 reliable methods. Part 1: How Does Microsoft Teams Record Meeting Itself Microsoft Teams has its built-in recording tool to let you record meetings on the platform for later viewing or sharing with others who cannot participate in the meeting. However, this function is not included in the free plan of Microsoft Teams. If you need it, just follow the steps below: Step 1 : Launch Microsoft Teams on your computer to start or join a meeting; Step 2 : Tap on the "More options..." button in the meeting controls and choose "Start recording" in the pop-up small window; Step 3 : Sim...


Comments
Post a Comment