How Can FFmpeg Cut and Trim Video in Lossless Quality
As a free and open-source video processing tool, FFmpeg is well received by people. Though, based on command-line technology, most of them can't skillfully operate it to perform some actions like trimming videos. For this, the following provides details on how FFmpeg trims videos and also gives a simple-to-operate yet equally powerful alternative to FFmpeg - Joyoshare Media Cutter.
- Part 1. Trim Video with FFmpeg
- Part 2. Trim Video with FFmpeg Alternative
Part 1. How Does FFmpeg Trim Videos
As a matter of fact, FFmpeg uses the Seeking command to help you find a designated section from your input video and extract it off or trim out a part. The following command line is used to trim video in FFmpeg, which is fast and adopts Key Frame to seek. Importantly, the stream copy enables to trim video without re-encoding and meanwhile keeps original quality for the output video. Here we will show you definite meaning for all of them.

-i: It stands for the input video file. Here is the input.mp4 behind it.
input.mp4: It means the input video file, which is called and named as you wish.
-ss: It defines the start of the section that you want to trim.
00:01:40: This concrete point (start time) can be sought from the input file.
-to: It's the end of the section that you want to trim.
00:02:16: This specific point (end time) can be sought from the input file.
-c copy: This is an option meaning trimming video via stream copy, which is fast and will not re-encode the video.
output.mp4: It's the name of your output file and you can name it as desire.
Note: You can see "-t" also from what someone else shows. It means the duration of the section to trim, rather than the end time. This is often misunderstood.
Part 2. Alternative Way to FFmpeg Cut Videos - Joyoshare Media Cutter
Admittedly, it is possible to let FFmpeg split video, but, for inexperienced novice users, it is indeed difficult to understand and operate the tool personally. In consequence, finding a more viable alternative is imperative. That's why Joyoshare Media Cutter is here.
It's able to trim videos, audios and even Live Photos without re-encoding and keep the same high quality. Aside from that, Joyoshare Media Cutter is competent to crop, flip, watermark, rotate, subtitle and apply effects to all kinds of videos with the built-in editing tools.
It's able to trim videos, audios and even Live Photos without re-encoding and keep the same high quality. Aside from that, Joyoshare Media Cutter is competent to crop, flip, watermark, rotate, subtitle and apply effects to all kinds of videos with the built-in editing tools.
Key Features of Joyoshare Media Cutter:
Allow setting a precise time interval for trimming videos
With unparalleled speed to cut, up to 60X
Offer real-time preview window to better locate each frame
Trim MP4 without reencoding in lossless quality (also for other formats)
Step 1: Open the program to add video
Double-click the desktop application, Joyoshare Media Cutter, for a quick start. Next, you'll intuitively be guided to drag and drop a video to the program. Alternatively, you can go direct to add from a local folder with a tap on the "Open" button.
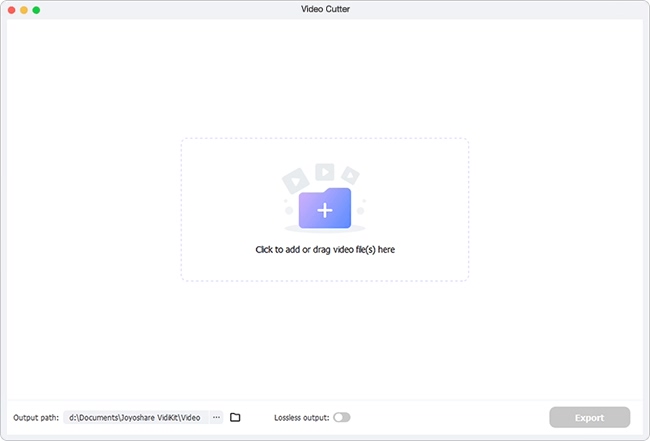
Note: This program is designed for the trimming of a single file, which lets you import only one file at a time.
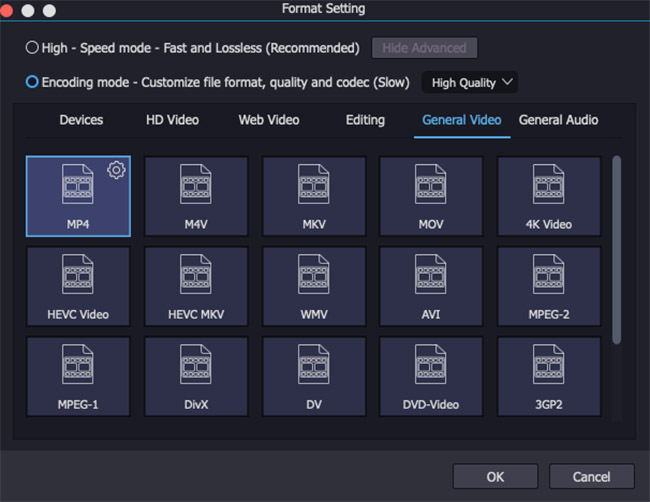
Step 2: Trimming mode selection
Go forward to the "Format Setting" window by clicking on the "Format" tab in the main interface. There are two supportable modes: High-Speed mode and Encoding mode. The first one is developed to only cut video fast without quality degradation while the second one is developed to customize video, codec, and quality in an editable way. You can make High-Speed mode your top choice.
Step 3: Trim video visually
While watching the imported video in the visual preview window, you can determine which point to trim. Pause and cut with "Set Segment Start Time" and "Set Segment End Time" buttons below the timeline. Or here's an easy-to-operate way, allowing you to quickly move the yellow handles and cut out undesired beginning & end. Joyoshare Media Cutter besides accurately trim the video by setting the temporal interval.

Trim out the middle section: Press the "+" button to generate more than one segment in the list. Locate and position to different segments separately to trim whatever you want. Next, check the "Merge Segments" option to join them together.
Step 4: Start outputting video
After finish trimming a video, you can go for the "Preferences" in the upper-right corner to set a storage location that you want to save. Then, click on the "Start" option to export and later check on the local folder.
For more info, please visit the source page:


Comments
Post a Comment