How to Fix iPad Is Disabled Connect to iTunes
You will inevitably run into some iOS problems. Apart from the most common Apple white logo, black screen, stuck in recovery mode, iPad won't turn on, etc., iPad is disabled connect to iTunes error occurs frequently as well. It is most likely that you have entered wrong passcode for many times and is locked out the iPad. What can you do? Be happy; 5 Solutions on how to fix iPad is disabled connect to iTunes are listed in detail here.
Part 1. Hard Reset to Fix Disabled iPad
According to what suggest from Apple forum users, a hard reset operation can work to fix this "iPad cannot connect to iTunes" error. It's fairly simple-to-use. You just have to hold down iPad "Home" button and its top lock button at the same time until iPad shuts down. Then hold press them again to until iPad turn on. After that, go to have a check whether previous error message is out there or not.

Part 2. Restore with iTunes to Fix Disabled iPad
Another easy and widely-used method to fix iPad is disabled connect to iTunes error is to restore iPad with iTunes. Now let's start to use an already synced iTunes backup to restore iPad.
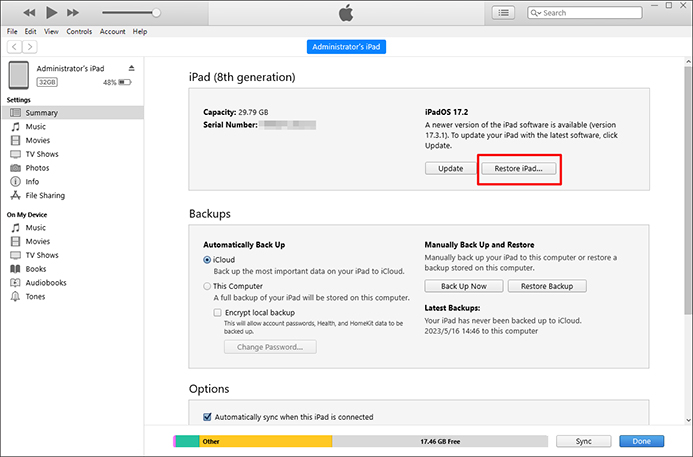
Step 1: Run iTunes and connect iPad to the computer you have trusted before;
Step 2: iTunes will begin to sync your device automatically;
Step 3: Wait until the backup and sync ends and then tap on "Restore iPad";
Step 4: An iTunes pop-up window will be shown to ask you to set up the device; select "Restore";
Step 5: Choose your iPad and get the most recent iPad backup selected;
Step 6: The disabled iPad can be restored now.
Part 3. Erase with iCloud to Fix Disabled iPad
Hopefully, erasing device from iCloud can also be taken into your consideration as a recommended option. It can additionally be applied when your iOS device is lost or stolen. Here's how:
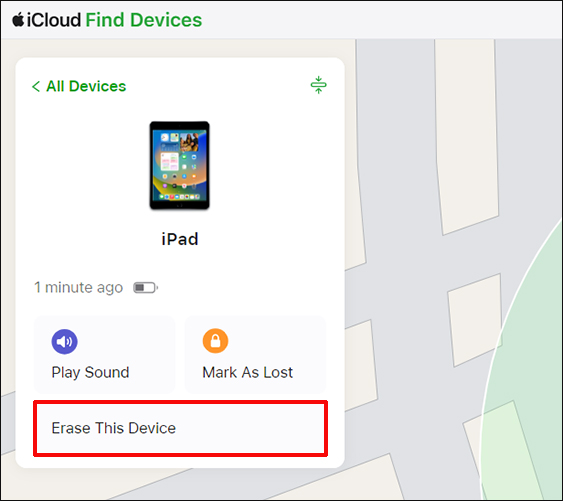
Step 1: Navigate to iCloud.com on any browser;
Step 2: Log in iCloud account with Apple ID and passcode;
Step 3: Access to "Find My iPhone" option and click to see "All Devices;
Step 4: Press on your disabled iPad name and simply hit "Erase iPad".
Part 4. Restore in Recovery Mode to Fix Disabled iPad
The one who has never synced iPad to iTunes can get iPad is disabled connect to iTunes fix with the help of recovery mode. Likewise, all data will be erased as well. Just have a look as below:

Step 1: Turn off your iPad;
Step 2: Hold and press the "Home" button and plug it to computer;
Step 3: Release the Home button until you can see "connect to iTunes" - recovery mode screen;
Step 4: A pop-up window will ask you to restore this iPad; click "OK" to confirm.
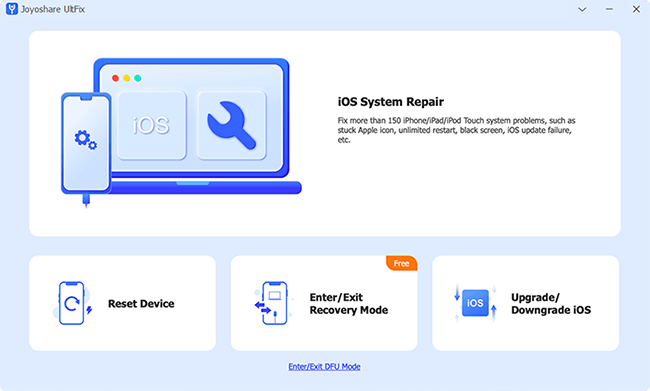
Part 5. Repair with iOS System Recovery to Fix Disabled iPad
Joyoshare UltFix iOS System Recovery is definitely a commendable iOS repair tool. It can be used to restore iPad to factory settings without passcode and iTunes. Most of all, it is able to freely enter or exit recovery mode with only one easy click.
Actually aside from iPad is disabled connect to iTunes, this iOS system recovery can also put into effect to repair more 30+ system issues, like iPhone in boot loop, iPhone stuck in DFU/recovery mode, iPhone keeps restarting, iPhone activation error, iPad won't turn on, iPad bricked, etc. It's even compatible with iOS 12 and the latest iPhone XS/XR effortlessly. When it comes to unlock passcode, it supports 4-digit/6-digit passcodes, Touch ID and Face ID fully. Besides, the uncluttered interface and compact icon also makes it sought-after by more and more users.
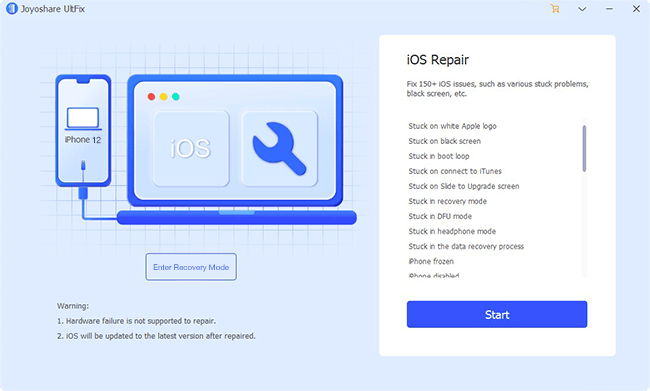
Step 1 Open Joyoshare and connect disabled iPad
Get Joyoshare UltFix iOS System Recovery started on your computer and use an original USB cable to connect your disabled iPad. Simply click on "Start" button.
Step 2 Set iPad into recovery/DFU mode
Joyoshare offers 2 different repair modes. Standard mode can fix common iOS problems, like black screen, iPhone stuck on Apple logo, iPhone won't turn on, etc. without data loss. Advanced mode can repair special system issues and remove screen lock via factory reset. Now you should select "Advanced Mode" and press on "Next" button to continue to manually boot iPad to DFU/recovery mode.
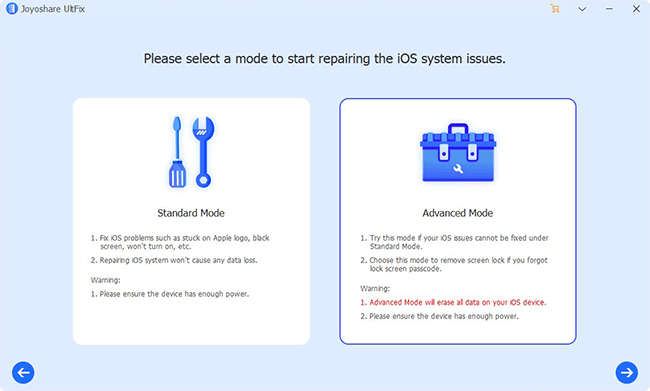
Note: There is an "Enter Recovery Mode" button set in the main interface of Joyoshare UltFix program, which allows you to quickly enter and exit recovery mode with one click.
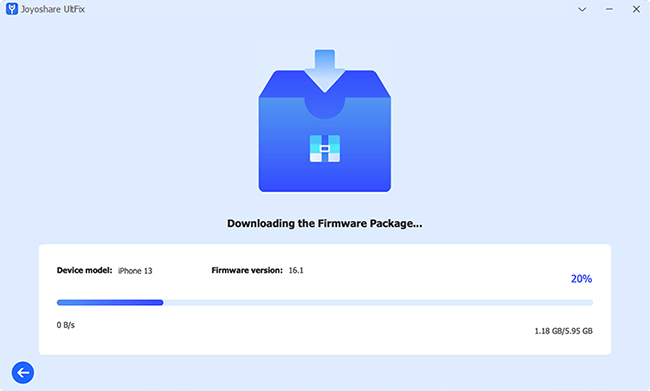
Step 3 Download and verify firmware package
When your iPad is in recovery/DFU mode, Joyoshare will display all device info in your sight. Check it carefully and then go forward to click "Download" option to download and verify firmware package.
Step 4 Fix iPad is disabled connect to iTunes

Be patient as the downloading and verification process will cost some time. After that, you can tap on "Repair" button to get your disabled iPad back to normal.
For more info, please visit the source page:
https://www.joyoshare.com/iphone-repair/ipad-is-disabled-connect-to-itunes.html
You May Also Like:
6 Simple Methods to Fix iPhone Activation Error
For more info, please visit the source page:
https://www.joyoshare.com/iphone-repair/ipad-is-disabled-connect-to-itunes.html
You May Also Like:
6 Simple Methods to Fix iPhone Activation Error


Comments
Post a Comment