How to Cut Video in iMovie with Ease
iMovie is a powerful video editing software application that comes with macOS, iOS, and iPadOS devices. With iMovie, you can enjoy your videos like never before. It includes a number of options to customize and enhance videos in various ways, such as crop and rotate video clips, add video transitions, stabilize shaky videos, speed up or slow down videos, and a whole lot more. If you wonder how to cut video in iMovie but are struggling to figure it out, you can depend on this article. This easy guide will show you how to do that step by step without any hassle.
- Method 1. Trim Video Files in iMovie
- Method 2. Split Video Files in iMovie Alternative
Method 1. Complete Guide on Cutting Videos in iMovie
As Apple's own movie app, iMovie enjoys a high reputation from the majority of users owing to its an open-source that can be compatible well with Mac operating systems. It is responsible for cutting your video files with relatively simple operations.
Note: You should be cautious to chop off any content from your specific video. When the video clip is exported, you will have no chance to change and store it. Besides, it can only available for Mac and iOS as well.
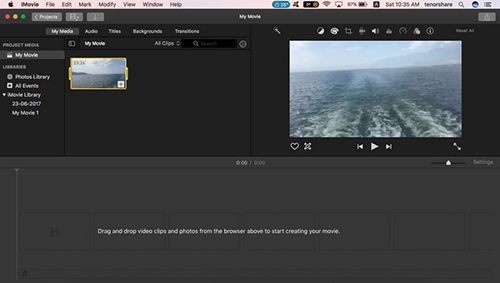
Step 1 Select a video clip you want

Open iMovie and click "Import Media" to add a video file you like. Having loaded it, go to press the "+" icon in the lower right corner of the video. It is accessible for you to drag and drop it from the viewing window to the timeline for later editing.
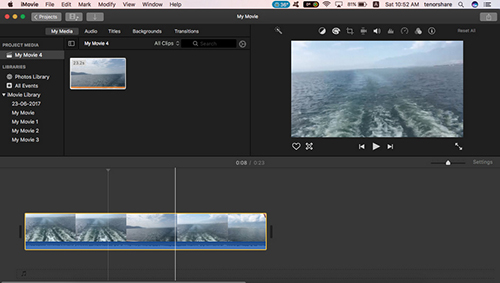
Step 2 Position the playhead to the desired place for cutting

Select the video to cut by clicking on it, making it blue. Get the cursor placed at the specific position where you want the given video split. Tab the "edit" menu to select the "split video clip at playhead".
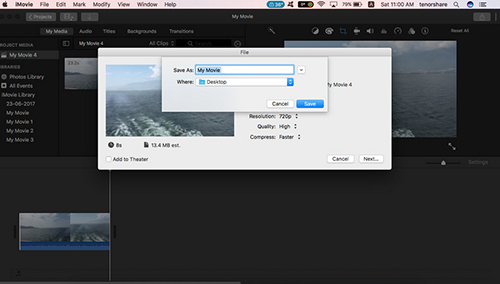
Step 3 Generate video file

It's your time to press the "Share" icon in the upper right corner. You can rename the video and choose a storage location in person. Then click "Save" to store it on your computer locally. You can repeat the above-mentioned steps to crop videos in iMovie if you need.
Method 2. Optimal Solution to Cut Videos - Joyoshare VidiKit for Mac
Joyoshare VidiKit (originally Joyoshare Media Cutter) is an exceptional iMovie alternative you can utilize to cut videos on Mac. Meanwhile, it can as well give you Windows entrance to trim videos. No matter which version you choose, you can get processed videos without altering the original quality.
With an innovative acceleration processor, this eye-catching video cutter is capable to accomplish any cutting assignment at up to 60X faster speed, being one of the most efficient video splitters in the current market. Differing from others, it includes full supports for diverse output formats along with popular devices, consisting of M4V, AVI, MP4, MPG, MPEG, 3GP, 3G2, WMV, ASF, RM, HD MKV, HD MOV, HD MP4, M4A, M4B, M4R, AAC, AC3, MKA, OGG, AIFF, or iPhone, iPad, Apple TV, Xbox 360, PSP, Android, Blackberry Bold, etc.
Excluding trimming unwanted portions, Joyoshare VidiKit allows you to customize codec, quality, bit rate, sample rate, channel, resolution, etc. in a flexible manner. Furthermore, you can use it to extract audio tracks from designated videos, remove noisy sections, make ringtones for iPhone, or even merge video cuts together from the same source.
Key Features of Joyoshare VidiKit:
Cut any video files without re-encoding
Export video in any format or device
With 60X faster speed to conduct cutting tasks
Extract audio track from the original video
Create ringtone for iPhone in an accurate way
Step 1 Import video files to Joyoshare VidiKit for Mac
At first, you should launch the alternative to iMovie, Joyoshare VidiKit, if you have fitted out your computer with it already. Then click the "Open" button to add a required video. Or you can directly drag the video file to the main interface.
Step 2 Strip certain fragments from imported video
You can get two available methods to figure out which part you want. Move the slider keys to locate a definite cutting point or set the exact start time and end time in temporal intervals. The good news is that Joyoshare will auto-play the video for you. With the help of the handy timeline, you can better enhance the preciseness.
Note: The same video source can be cut into several clips at a time. If you want to combine them together, you can go to press the "+" button and choose the "Merge segments" option.
Step 3 Select output mode for your video file
Hit the "Format" panel and you will see two different output modes offered. The "High-Speed" mode lets you get edited video quickly with 100% original quality. However, if you choose "Encoding" mode, you will have the right to get a customized video with high quality.
Step 4 Set out to cut a video file
Click the "Start" button to trim the video clip on Mac as long as you have got all settings ready. Just a moment later, you will see the finished video from your destination folder.
For more information, please visit the source page: https://www.joyoshare.com/video-cutting/cut-videos-in-imovie.html


Comments
Post a Comment