6 Simple Solutions to Fix iPhone Activation Error
iPhone activation error often occurs when you activate a newly purchased iPhone, factory reset an iPhone or restore the iPhone. When the problem shows up, the iPhone stuck on an inactive screen which displays "Activation Error" or "Could Not Activate iPhone" message. The unavailable activation server, iTunes failing to verify iPhone, not supported SIM card and many other scenarios can result in the activation error. If you are still not sure how to fix the problem, the following 5 solutions will help you.
Part 1. 5 Ways to Fix iPhone Activation Error Effortlessly
It is better for you to ask for support from a near Apple Technical Support Team, which can give you professional suggestions and help. However, you needn't hurry too much. If you would like to have a try in your own way, the following 5 workarounds can come in handy.
#1 Check Network Connection

An unstable network can lead to an Apple iPhone activation error. Besides, chances are that your network is blocking gs.apple.com on some ports or Apple's servers are black on the designated network. If you've previously activated your phone with a cellular data connection, try a strong, stable and reliable WiFi network this time. Or you should try a different WiFi source rather than the one you used before.
#2 Try Again
The one who meets this iPhone activation error message for the first time can wait for a moment. The fact is that sometimes Apple servers take more time to process the activation request. Nevertheless, if the situation is still the same without improvement, it is advisable to try again to activate iPhone with steps below:
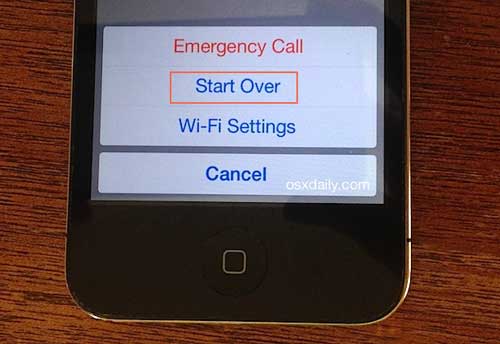
Step 1. Press the "Home" button to let iPhone display "Emergency Call", "Start Over" and "Wi-Fi Settings";
Step 2. Click on "Start Over" option to go back to the beginning of iPhone setup screens;
Step 3. Set iPhone again by following the screen prompts; operate more times if it not work.
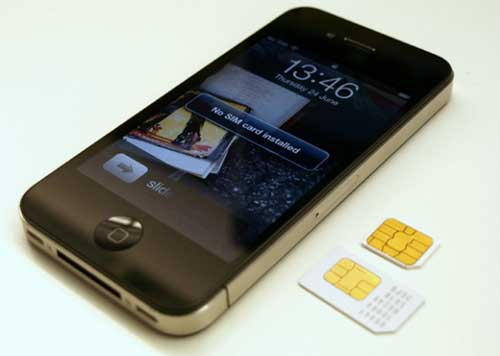
#3 Check SIM Status
All that important is to check whether you have already inserted a SIM card into your iPhone. Additionally, having a call to your carrier straightly is also necessary, which helps to activate iPhone as well as SIM card simply. Of course, you can also refer to a quick guide to activate SIM by yourself.
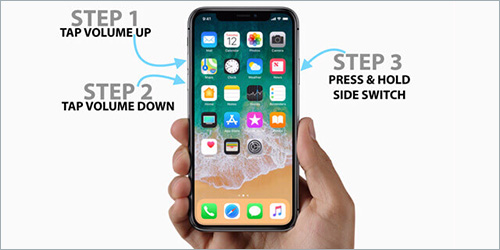
#4 Restart iPhone
Just like other iOS issues, the simplest way to how to activate iPhone without error is to restart your iPhone. Even though no 100% success rate is guaranteed, it is still worth a try. What you have to do is just press the "Power" button to slide to power off and reboot your iPhone. Likewise, a force restart can work as well.
#5 Activate iPhone via iTunes
Provided the aforementioned methods are not effective to fix the iPhone activation error, you are enabled to apply another solution. Make the full use of your iTunes to activate iPhone. It might a bit complex; just have a reference at the guide here:
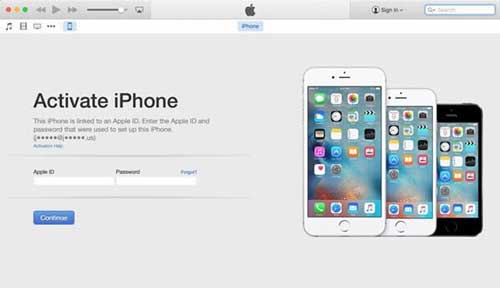
Step 1. Get the latest version of iTunes installed on the computer;
Step 2. Ensure that the computer has an Internet connection;
Step 3. Launch iTunes and connect iPhone with a USB cable;
Step 4. Wait for a while and iTunes will detect and activate your iPhone.
Note: Your iPhone is activated if iTunes shows "Set up as New" or "Restore from Backup". However, if there is an error in iTunes indicates that the SIM card isn't compatible, you ought to contact your carrier.
Part 2. How to Fix iPhone Back to Normal without Data Loss
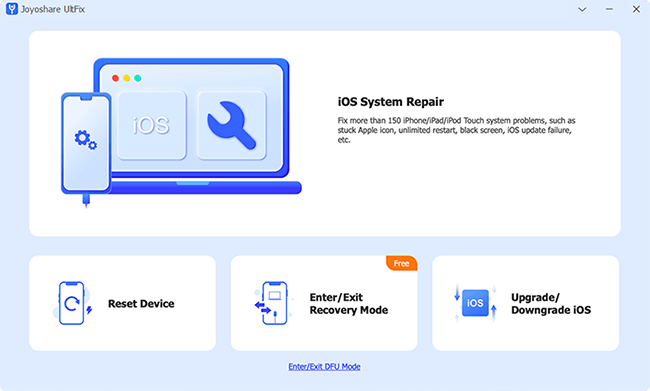
Perhaps, there is no access to activate your iPhone with the above-listed solutions. You may wonder what to do in this case. Don't be anxious. Take the aid of Joyoshare UltFix iOS System Recovery to repair this tricky iPhone activation error with no data loss.
This brilliant iOS repair tool can be compatible with all iOS versions and models powerfully so that your iOS 12 or iPhone XS/XR can be supported without hassle. Other than that, it's also capable of fixing more than 30+ iOS system issues efficiently, including iPhone stuck on Apple logo, iPhone in boot loop, black/white/red/blue screen, iPhone stuck in recovery/DFU/headphone mode, iPhone no service, iPhone is disabled connect to iTunes, etc. The most attractive point is that it gives a free option to enter or exit recovery mode with only one click.
This brilliant iOS repair tool can be compatible with all iOS versions and models powerfully so that your iOS 12 or iPhone XS/XR can be supported without hassle. Other than that, it's also capable of fixing more than 30+ iOS system issues efficiently, including iPhone stuck on Apple logo, iPhone in boot loop, black/white/red/blue screen, iPhone stuck in recovery/DFU/headphone mode, iPhone no service, iPhone is disabled connect to iTunes, etc. The most attractive point is that it gives a free option to enter or exit recovery mode with only one click.
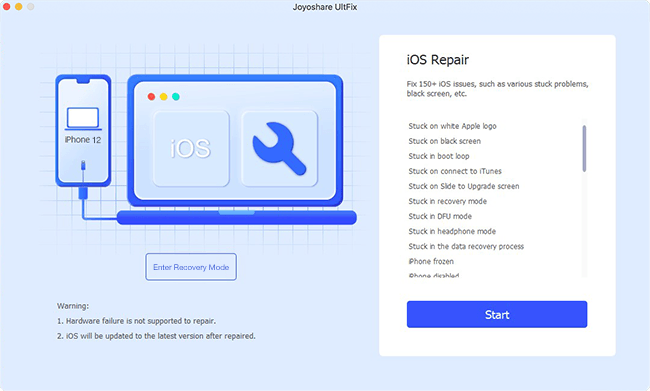
Step 1 Launch Joyoshare UltFix and connect iPhone
Download and install Joyoshare UltFix iOS System Recovery on your computer (Win/Mac). Simply get it started and go to connect iPhone. Then tap on the "Start" button to continue.
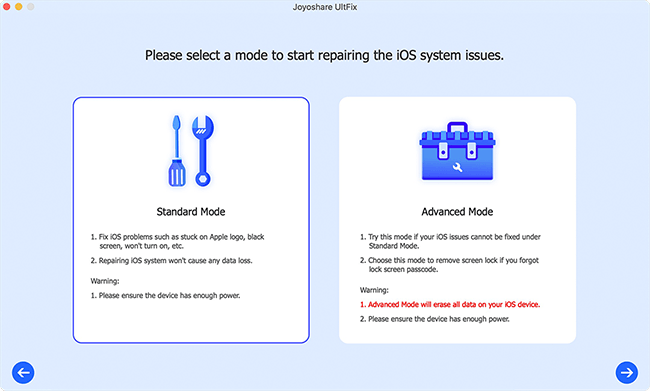
Step 2 Select repair mode and boot into recovery/DFU mode
This program comes with 2 repair modes: Standard Mode & Advanced Mode. The former fixes common system issues and causes no data loss while the later repairs iOS in serious situations where the standard mode is failed and will erase all data. You have to choose one repair mode and then click on the "Next" button to set your iPhone to DFU/recovery mode.
Step 3 Download and verify firmware package
Confirm your iPhone device info after entering recovery/DFU mode successfully. Hereafter set about downloading and verifying the firmware package by clicking the "Download" button at the right bottom.

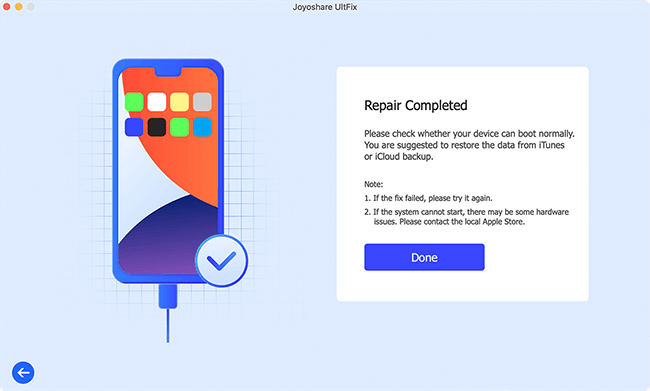
Step 4 Start to fix iPhone activation error
It will take some time to complete firmware package downloading and verification. Afterward, simply press on the "Repair" button to ask Joyoshare UltFix to start to fix your iPhone activation error.
https://www.joyoshare.com/iphone-repair/iphone-activation-error.html


Comments
Post a Comment