How to Record Audio from YouTube Effortlessly
It always happens to us when we watch a YouTube video, we find its background music is attractive and feel like to save it on local folder for further listening. Nevertheless, problem is that what we need is just the related audio not the video itself, which seems not easy to get directly. Hence, to salvage you, we’d like to show complete guide on how to record YouTube audio with ease.


Part 1. Powerful YouTube Audio Recorder - Joyoshare Screen Recorder
Joyoshare Screen Recorder for Windows (or Joyoshare Screen Recorder for Mac) is a professional YouTube audio recorder that enables you to record all types of audios, such as YouTube audio, streaming music, online radio, game music, microphone sound, system audio, etc. in few clicks. With a well-designed built-in audio encoder, this smart software includes full support to diverse popular formats, like MP3, AAC, WAV, M4A, M4B and FLAC.
Best of all, Joyoshare Screen Recorder comes with ability to edit ID3 tags info in manual manner, which allows you to polish your audio file by correcting title, artist, composer, year, genre, cover, etc. During the recording process, you can as well get chance to skip any unwanted sections and cut your audio recording to different segments in the way you like. Other than that, it can let you create scheduled task, utilize shortcuts, specify format configuration, etc. as per your preferences.
Best of all, Joyoshare Screen Recorder comes with ability to edit ID3 tags info in manual manner, which allows you to polish your audio file by correcting title, artist, composer, year, genre, cover, etc. During the recording process, you can as well get chance to skip any unwanted sections and cut your audio recording to different segments in the way you like. Other than that, it can let you create scheduled task, utilize shortcuts, specify format configuration, etc. as per your preferences.
Key Features of Joyoshare Screen Recorder:
-
Record audio from YouTube in lossless quality
-
Offer capability to edit ID3 tags info directly
-
Support popular formats: MP3, AAC, MAV, FLAC, M4A and M4B
-
Be flexible enough to skip needless parts and cut recording

Next we can have a look at the complete guide on how to record YouTube audio by using Joyoshare Screen Recorder for Windows.
Step 1 Run Joyoshare and switch recording mode
Simply launch Joyoshare Screen Recorder on your computer and go ahead to choose audio recording mode by hitting the  icon next to "REC" button. To avoid unexpected intervention, you'd better disable your microphone sound and only turn on the system audio.
 icon next to "REC" button. To avoid unexpected intervention, you'd better disable your microphone sound and only turn on the system audio.
Note: This program can come in handy as well when it comes to record desktop video activity, like YouTube video, Skype calls, Facebook chats, GoToMeeting webinars, Google Hangouts, class lecture, etc. To do that, you can just head to the video recording mode near to "REC" button.
Step 2 Decide recording preferences
Press the gear icon at the bottom right corner to bring up all hidden options. You can change storage location, select desired format, set designated shortcut, create recording task, etc.

Step 3 Ready to capture YouTube audio
Go forward to play your YouTube video and click "REC" button to initiate recording. When it is in process, you have right to skip unwanted portion by pressing the "Pause" button and slice your recording by hitting the "Scissors" icon.

Step 4 Manage output audio file(s)
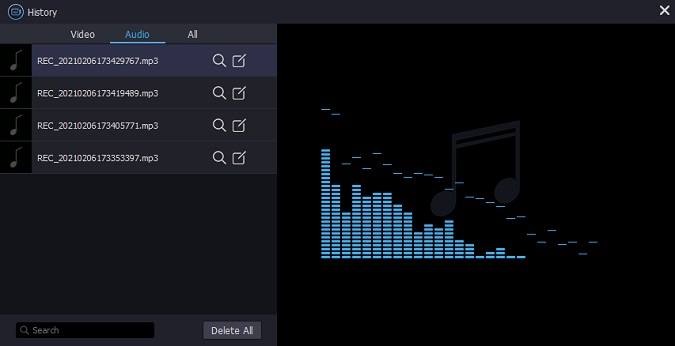
Upon you end the recording process; you will be led to "History" list, from which you can see all captured YouTube audio file(s). Afterwards, you can tap on the "Search" icon to find local folder or click the "Edit" icon to revise related ID3 info.

Certainly, you are permitted to revise the music's name and correct the ID3 tags information, like title, album, composer year, cover, etc.
Part 2. Capture Audio from YouTube with Online YouTube Program
Certainly, not everyone prefer to an offline solution. For some users, it's more straightforward to record YouTube audio online, which requires no third-party software installation. Most importantly, it can deliver you an excellent platform to get audio from YouTube video quickly. To delight you, we specially selected such a forthright tool for you. That is YouTube to MP3 Converter. Let's see how it performs now.

Step 1: Navigate to required website. Then copy and paste a complete YouTube video link.
Step 2: Set output format for your audio, like MP3, AAC, OGG, M4A, etc.
Step 3: Confirm more settings, including audio quality, start time and end time.
Step 4: Click "Start" button to grab YouTube audio.
Step 5: Once the conversion comes to end, download the exported audio file to your computer.
For more info, please visit the source page:
https://www.joyoshare.com/record-screen/record-audio-from-youtube.html
You May Also Like:
Best Way to Record Screen with QuickTime Easily
How to Record Yahoo Messenger Video Chats
https://www.joyoshare.com/record-screen/record-audio-from-youtube.html
You May Also Like:
Best Way to Record Screen with QuickTime Easily
How to Record Yahoo Messenger Video Chats

Comments
Post a Comment